DECK FRAME
BUILDING THE STANDARD DECK FRAME
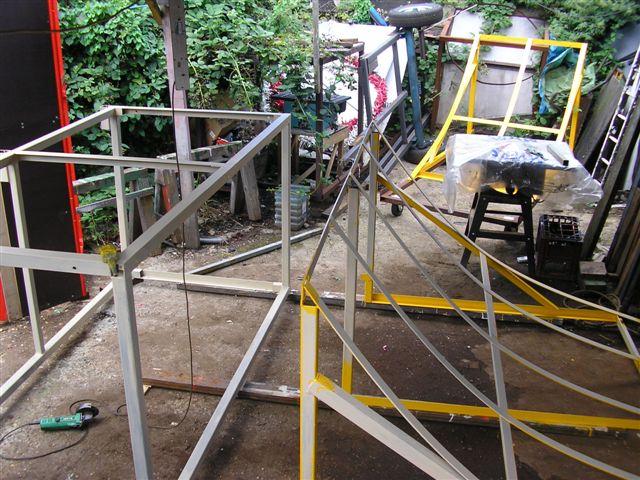
Keep referring to Pic at the bottom
The sizes and shapes are all based on a module size that reflects the size of the boards you are using. As the boards are 8ft x 4ft (2440 x 1220mm), we work to that size- saves a lot of cutting, and you can also use full sheets as braces when welding frames together.
So our basic deck module is 4ft high, 4ft deep and 8ft long. This is handy because PAS35 says decks must be minimum 4ft deep, and 8ft long. Easy isn’t it? Not quite.
Your basic deck sheet is 8ft x 4ft, but you also want it to overlap your 18mm side panels, that will box the ramp in, so you need to have your steel frame 18mm smaller on three sides.
If your 8ft module is going to butt up to another one, you don’t need that 18mm allowance on the two faces that join, because there won’t be a side panel. I found it easier to actually work this out as I cut the steel length by length, rather than try to make a cutting list that allowed for every oddity on the entire park. We had most of the steel cut to 8ft and 4ft lengths by the supplier, and lopping off the odd inch did make a bit of waste, but made the construction simpler.
So, To Work…, making our first stand alone deck module:
Laying out the Base
1. BASE
On a flat floor lay out two 8’ lengths of box, and two 4ft lengths of angle.The angles need to fit inside the box, so each need 4” lopped off to still be 4ft overall, because of the thickness of the box (2”) at each end.
It is now that you decide the allowances you are going to make for your side panels, and lop off the appropriate 18mm’s.If we assume that this first deck module is going to stand alone, it will need 18mm allowance at both ends and the back, so our lengths will be:
Box : 2440 (8ft) less 18mm at EACH END (for ply) 36mm = 2404mm
Angles: 1220 (4ft) less 18mm at ONE END (for Ply), and 50mm (for box) at BOTH ENDS 1220 – 18mm – 50mm -50mm = 1102mm
Now drill a 13mm hole about 150mm from each end of each angle, on the face that will be on the floor. These will be your eventual mounting points.
Set the angles into the frame with the holes on the floor, and the uprights to the outside of the frame. This will eventually be the mounting plate for the side panels.
Now square them up, clamp them and weld them. Keep checking your squares.
This pic is useful because it shows the deck and quarter frames for a 4ft quarterpipe. You can see the setup of the base, with the drilled angle irons at each end that bolt to the concrete, and how the top frame has the front rail made of angle and drilled to attach the quarter pipe ramp.
If you look carefully at the top of the quarter, you can just see the studs that will bolt it to the deck. This top rail is the flat bar that must be drilled at the same time as the angle top rail on the deck frame, they have to be accurate to line up on site. You can also see the braces at the back and top that help support the deck and back sheets of ply, and if you look very carefully you can see the handrail brackets at the very back. You will see this pic again when we discuss the quarter ramp.
IMPORTANT TIPS
An important tip that an old craftsman taught me, and it applies equally to carpentry, metalwork, plumbing and even skateparks:
MEASURE TWICE, CUT ONCE
KEEP IT SQUARE
The building description here is the same for every size deck module : decrease the height and you have a funbox frame; increase it for 5ft and 6ft ramps.